Getting Started in Python#
ovrtx and ovstage are distributed on PyPI. Use uv to install both packages for the current attached-stage workflow:
uv add ovrtx ovstage
pip also works:
pip install ovrtx ovstage
ovstage is optional when maintaining standalone compatibility code. The renderer-owned scene APIs used by that mode are deprecated in ovrtx 0.4 and will move entirely to ovstage in a future release.
All the examples in the repository contain pyproject.toml files that are tested with uv. Python 3.10-3.13 are supported.
If installation fails, first verify that you are using Python 3.10-3.13 and that your environment can reach PyPI. If you need a specific release artifact, GitHub Releases also contain Python wheels that can be installed explicitly.
ovrtx runtime validation requires an NVIDIA RTX-capable GPU, a supported NVIDIA driver, internet access, and execution outside sandboxed environments. The minimal example downloads scene assets from S3. Supported driver versions are listed in Driver Requirements.
To get started, first clone the repository and run the first example with uv:
git clone https://github.com/NVIDIA-Omniverse/ovrtx.git
cd ovrtx/examples/python/minimal
uv run main.py --png
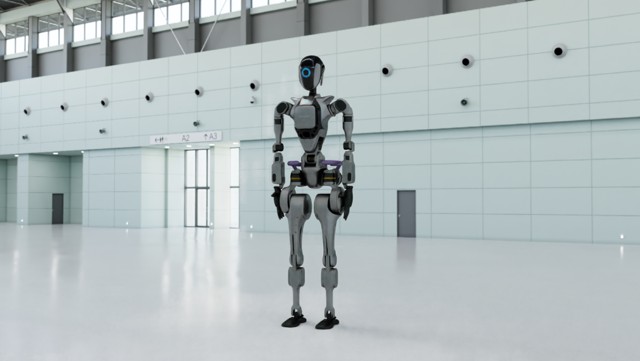
The minimal example shows how to create the renderer, load an OpenUSD scene, and render a single image, copying the results back to the CPU for display.
A successful run writes _output/render.png. The output should match the reference image below.
The first step from a newly built application will block for 1-2 minutes while shaders are compiled and cached.
Minimal Example#
import argparse
import sys
from pathlib import Path

import numpy as np
import ovrtx
import ovstage
from PIL import Image

USD_URL = "https://omniverse-content-production.s3.us-west-2.amazonaws.com/Samples/Robot-OVRTX/robot-ovrtx.usda"


def main():
    parser = argparse.ArgumentParser(description="Minimal ovrtx Python example")
    parser.add_argument("--png", action="store_true", help="Save render to _output/render.png instead of displaying")
    args = parser.parse_args()

    # Create the Renderer and attach the stage that owns scene data.
    print("Creating renderer. The first run of the application will take some time as shaders are compiled and cached...", file=sys.stderr)
    renderer = ovrtx.Renderer()
    stage = ovstage.Stage("ovrtx.example.minimal")
    renderer.attach_ovstage(stage)
    print("Renderer created.", file=sys.stderr)

    print(f"Opening {USD_URL}...", file=sys.stderr)
    ordinal = 1
    ovstage.population.open_usd(stage, USD_URL, ordinal=ordinal)
    stage.advance_write_floor(ordinal, ovstage.Scope.ALL).wait()
    print("USD loaded.", file=sys.stderr)

    # Step the renderer to simulate the Camera at 60Hz
    print("Stepping renderer...", file=sys.stderr)
    products = renderer.step(
        render_products={"/Render/Camera"},
        delta_time=1.0 / 60,
        ordinal=ordinal,
    )
    print("Stepped renderer.", file=sys.stderr)

    # Get the Camera output for the step as a numpy array and display it
    print("Fetching results...", file=sys.stderr)
    for _product_name, product in products.items():
        for frame in product.frames:
            var = frame.render_vars["LdrColor"].map(device=ovrtx.Device.CPU)
            view = np.from_dlpack(var)
            pixels = view.copy()
            del view
            var.unmap()
            del var
            img = Image.fromarray(pixels)
            if args.png:
                output_dir = Path("_output")
                output_dir.mkdir(exist_ok=True)
                img.save(output_dir / "render.png")
                print(f"Saved to {output_dir / 'render.png'}", file=sys.stderr)
            else:
                img.show()
    print("Fetched results.", file=sys.stderr)

    del frame, product, products
    renderer.detach_ovstage()
    stage.destroy()
    renderer.destroy()


if __name__ == "__main__":
    main()
The example above is provided as a Python project in the examples/python/minimal directory in the repository.
Next Steps#
Explore more Examples including the Planet System demo with GPU-accelerated animation.
Refer to the Python API Reference for the full Python API.