

Python: Video Textures#
This example maps a generated H.265/HEVC video onto geometry, selects four source times, renders every result, and logs the frames to one Rerun recording. The video contains a timestamp overlay and moving ball, so both the person viewing the recording and the CI checks can detect a stale frame. The dark-blue background and orange ball provide high visual contrast.
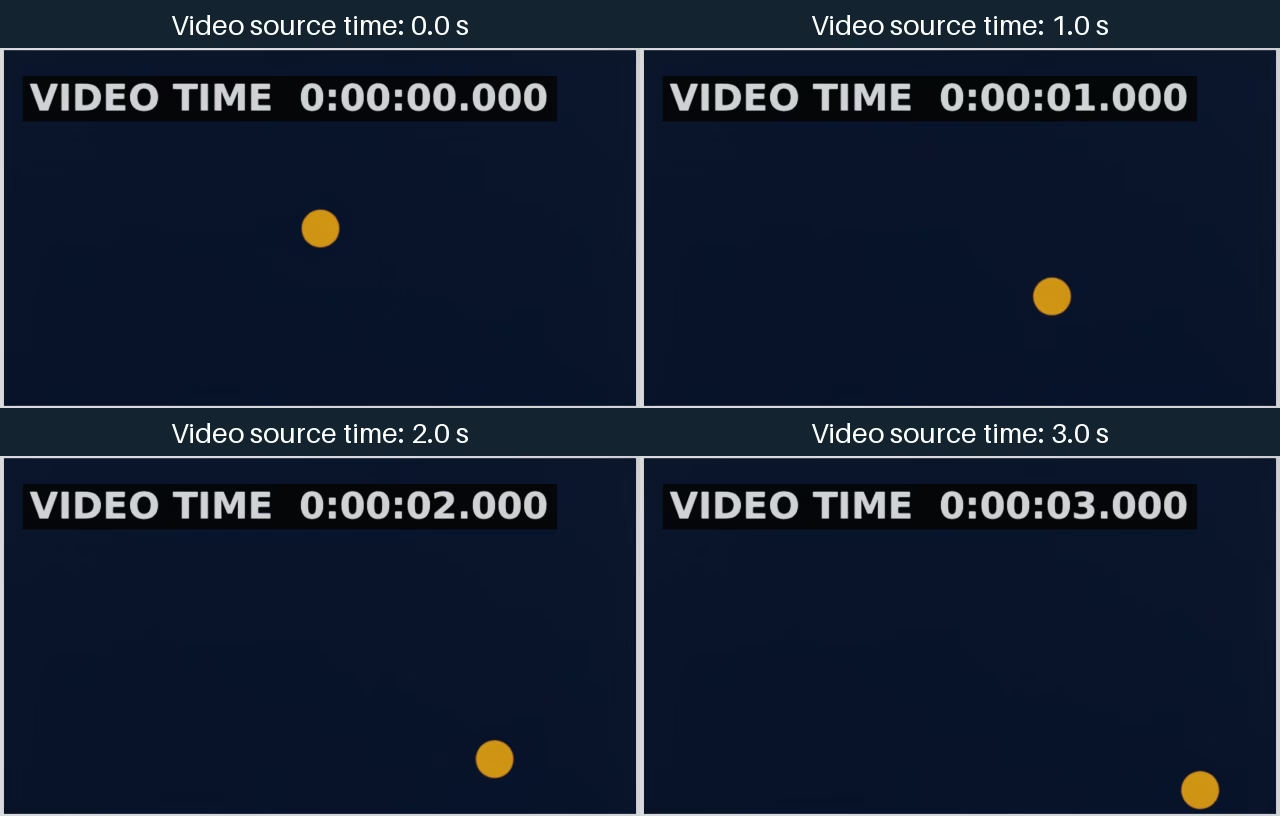
The same H.265 texture rendered at 0, 1, 2, and 3 seconds.#
“Create a video-texture example with a visible timestamp and moving object, render several source times, and make the results playable in Rerun.”
See Video Textures for media requirements, playback controls, color-space behavior, network sources, and limitations.
Walkthrough#
1. Assign the Video to an OmniPBR Material#
The sample creates an OmniPBR shader, assigns the H.265 file to its
inputs:diffuse_texture asset input, and connects the shader to the
material. It applies OmniPlaybackAPI:inputs:diffuse_texture so the same
shader can select a source range and define its behavior outside that range:
def Material "VideoMaterial_0"
{
    token outputs:surface.connect = <Shader.outputs:out>

    def Shader "Shader" (
        prepend apiSchemas = ["OmniPlaybackAPI:inputs:diffuse_texture"]
    )
    {
        uniform token info:implementationSource = "sourceAsset"
        uniform asset info:mdl:sourceAsset = @OmniPBR.mdl@
        uniform token info:mdl:sourceAsset:subIdentifier = "OmniPBR"

        asset inputs:diffuse_texture = @./video_texture_h265.mp4@ (
            colorSpace = "sRGB"
        )
        color3f inputs:diffuse_color_constant = (1, 1, 1)
        float inputs:reflection_roughness_constant = 0.4

        uniform float inputs:omni:playback:inputs:diffuse_texture:rate = 1
        uniform double inputs:omni:playback:inputs:diffuse_texture:sourceStart = 0
        uniform double inputs:omni:playback:inputs:diffuse_texture:sourceEnd = 3.9
        uniform timecode inputs:omni:playback:inputs:diffuse_texture:playbackStart = 0
        uniform token inputs:omni:playback:inputs:diffuse_texture:before = "hold"
        uniform token inputs:omni:playback:inputs:diffuse_texture:after = "hold"

        token outputs:out (
            renderType = "material"
        )
    }
}
material = UsdShade.Material.Define(stage, "/World/Looks/VideoMaterial")
shader = UsdShade.Shader.Define(stage, "/World/Looks/VideoMaterial/Shader")
prim = shader.GetPrim()

prim.CreateAttribute(
    "info:implementationSource", Sdf.ValueTypeNames.Token
).Set("sourceAsset")
prim.CreateAttribute(
    "info:mdl:sourceAsset", Sdf.ValueTypeNames.Asset
).Set(Sdf.AssetPath("OmniPBR.mdl"))
prim.CreateAttribute(
    "info:mdl:sourceAsset:subIdentifier", Sdf.ValueTypeNames.Token
).Set("OmniPBR")

texture = prim.CreateAttribute(
    "inputs:diffuse_texture", Sdf.ValueTypeNames.Asset
)
texture.Set(Sdf.AssetPath("./video_texture_h265.mp4"))
texture.SetMetadata("colorSpace", "sRGB")
prim.CreateAttribute(
    "inputs:diffuse_color_constant", Sdf.ValueTypeNames.Color3f
).Set(Gf.Vec3f(1.0, 1.0, 1.0))
prim.CreateAttribute(
    "inputs:reflection_roughness_constant", Sdf.ValueTypeNames.Float
).Set(0.4)
prim.ApplyAPI("OmniPlaybackAPI", "inputs:diffuse_texture")

prefix = "inputs:omni:playback:inputs:diffuse_texture"
prim.GetAttribute(f"{prefix}:rate").Set(1.0)
prim.GetAttribute(f"{prefix}:sourceStart").Set(0.0)
prim.GetAttribute(f"{prefix}:sourceEnd").Set(3.9)
prim.GetAttribute(f"{prefix}:playbackStart").Set(Sdf.TimeCode(0))
prim.GetAttribute(f"{prefix}:before").Set("hold")
prim.GetAttribute(f"{prefix}:after").Set("hold")

shader_output = shader.CreateOutput("out", Sdf.ValueTypeNames.Token)
material.CreateSurfaceOutput().ConnectToSource(shader_output)
The colorSpace metadata tells ovrtx to sample the decoded color as sRGB.
The sample selects the complete 0.0–3.9 second range and uses hold before
and after it, which makes frame selection clear at the clip boundaries.
2. Bind the Material to Geometry#
The sample creates a screen-shaped mesh with UV coordinates, applies
MaterialBindingAPI, and binds the video material to it. The UV coordinates
map the complete decoded frame across the screen:
def Mesh "Screen_0" (
    prepend apiSchemas = ["MaterialBindingAPI"]
)
{
    uniform bool doubleSided = false
    int[] faceVertexCounts = [4]
    int[] faceVertexIndices = [0, 1, 2, 3]
    point3f[] points = [(-1.777778, -1, 0), (1.777778, -1, 0), (1.777778, 1, 0), (-1.777778, 1, 0)]
    texCoord2f[] primvars:st = [(0, 0), (1, 0), (1, 1), (0, 1)] (
        interpolation = "faceVarying"
    )
    rel material:binding = </World/Looks/VideoMaterial_0>
    uniform token subdivisionScheme = "none"
}
screen = UsdGeom.Mesh.Define(stage, "/World/Screen")
screen.CreateFaceVertexCountsAttr([4])
screen.CreateFaceVertexIndicesAttr([0, 1, 2, 3])
screen.CreatePointsAttr([
    (-1.777778, -1, 0),
    (1.777778, -1, 0),
    (1.777778, 1, 0),
    (-1.777778, 1, 0),
])
screen.CreateSubdivisionSchemeAttr("none")

texcoords = UsdGeom.PrimvarsAPI(screen).CreatePrimvar(
    "st", Sdf.ValueTypeNames.TexCoord2fArray, UsdGeom.Tokens.faceVarying
)
texcoords.Set([(0, 0), (1, 0), (1, 1), (0, 1)])

material = UsdShade.Material.Get(stage, "/World/Looks/VideoMaterial")
UsdShade.MaterialBindingAPI.Apply(screen.GetPrim()).Bind(material)
3. Select and Render Video Timestamps#
The sample USDA deliberately omits differing start and end timecodes. Video
selection therefore uses the simulation clock. The example resets that clock
to zero once, then passes the difference between consecutive requested times
as delta_time to step_async(). Each RenderProduct
enables blocking video decoding, so its render waits for the selected frame.
The example bounds each wait with a timeout, so a frame that never decodes
fails with an error instead of hanging. The application then maps and logs the
image on the Rerun recording’s
video_time timeline:
# This stage has no animation range, so video selection uses simulation time.
if not renderer.reset_async(time=0.0).wait(timeout_ns=VIDEO_TIMEOUT_NS):
    raise TimeoutError(f"reset did not complete within {VIDEO_TIMEOUT_SECONDS} s")
current_time = 0.0
for index, video_time in enumerate(times):
    # Advance from the preceding requested timestamp to this one.
    render_product = f"/Render/Camera_{index}"
    pending = renderer.step_async(
        render_products={render_product},
        delta_time=video_time - current_time,
        ordinal=ordinal,
    ).wait(timeout_ns=VIDEO_TIMEOUT_NS)
    products = pending.fetch(timeout_ns=VIDEO_TIMEOUT_NS) if pending else None
    if products is None:
        raise TimeoutError(
            f"{render_product} did not render video time {video_time:.1f} s "
            f"within {VIDEO_TIMEOUT_SECONDS} s"
        )
    current_time = video_time

    # Put the mapped LdrColor image at its source time on the Rerun timeline.
    image = _map_ldr_color(products, render_product)
    rendered_frames.append(image)
    if rr:
        rr.set_time("video_time", duration=video_time)
        rr.log("render/video_texture", rr.Image(image))
    del products
double const source_times[] = { 0.0, 1.0, 2.0, 3.0 };
BallCenter const expected_centers[] = {
    { 320.0, 180.0 },
    { 412.7, 248.8 },
    { 496.4, 304.2 },
    { 562.6, 335.5 },
};

// This stage has no animation range, so video selection uses simulation time.
ovrtx_enqueue_result_t reset = ovrtx_reset(renderer_, 0.0);
ASSERT_API_SUCCESS(reset.status);
wait_no_errors(renderer_, reset.op_index, 0.0);
if (HasFatalFailure())
    return;

double current_time = 0.0;
for (size_t index = 0; index < 4; ++index)
{
    ovx_string_t render_product_path = ovx_str(index == 0 ? "/Render/Camera_0" :
                                               index == 1 ? "/Render/Camera_1" :
                                               index == 2 ? "/Render/Camera_2" :
                                                            "/Render/Camera_3");
    ovrtx_render_product_set_t render_products{};
    render_products.render_products = &render_product_path;
    render_products.num_render_products = 1;

    ovrtx_step_result_handle_t step_results{};
    ovrtx_enqueue_result_t step = ovrtx_step_with_stage(
        renderer_, render_products, source_times[index] - current_time, /*ordinal=*/1, &step_results);
    ASSERT_API_SUCCESS(step.status);
    wait_no_errors(renderer_, step.op_index, source_times[index]);
    if (HasFatalFailure())
        return;
    current_time = source_times[index];

    std::string render_var_path(render_product_path.ptr, render_product_path.length);
    render_var_path += "/LdrColor";
    expect_video_frame(
        renderer_, step_results, render_var_path.c_str(), source_times[index], expected_centers[index]);
    if (HasFatalFailure())
        return;
}
After rendering, the application validates every frame’s dimensions and data
type, checks for the dark background and white timestamp, and compares the
orange ball’s center with the expected position in the requested 10-FPS source
frame. --times requires consecutive values to be at least 0.1 seconds
apart, so every render advances by at least one source frame. Reversed, offset,
or placeholder frames fail.
Running#
From examples/python/video-textures:
uv run main.py
uv run main.py --rrd _output/video-textures.rrd --png _output/video-textures.png
uv run main.py --no-rr --png _output/video-textures.png
The first run may take up to 5 minutes while shaders compile and cache. Open
the .rrd file in Rerun to scrub the video_time timeline. Use --times
to choose one to four increasing positions in the clip’s 0.0-3.9 second
range, with at least 0.1 seconds between consecutive values.
Regenerating the H.265 Asset#
The committed clip is generated by generate_video.sh with GStreamer’s
videotestsrc, timestamp overlay, x265enc, h265parse, and mp4mux.
It is a four-second, 640×360, 10 FPS, seekable MP4 containing H.265 Main Profile
video. GStreamer is not needed to run the example.