

Your First Lidar Sensor#
Configure a lidar, render a scan and read its point cloud using the Lidar generic core model. The code comes from the runnable Python and C examples.
A sensor needs a USD prim that defines its pose and settings, plus a RenderProduct that requests its outputs. The workflow is:
Create the sensor prim and apply the schema that selects its model.
Override the attribute values you need.
Configure the output: a RenderProduct and a RenderVar.
Create the renderer.
Load the scene.
Warm up and step.
Read the output.
Display the output.
Radar, acoustic sensors and cameras use the same workflow with different prim types, model selection and outputs. See Sensor Configuration.
You need ovrtx and ovstage installed; refer to Getting Started in Python or Getting Started in C.
Sensor components#
Component |
Role |
|---|---|
Sensor prim |
A USD prim containing the sensor’s pose and settings: |
Sensor model |
The simulation that interprets the settings and produces outputs. Non-visual models use the prim type and applied API schema. Camera models are selected by the requested outputs. See Sensor Configuration. |
RenderProduct |
Binds the sensor through |
RenderVar |
Selects an output by |
Channel |
A named tensor inside a composite output, such as |
For a point cloud:
Request each channel you need.
CountsandFlagsare always delivered; other channels are produced only when requested.Read only the entries indicated by
Counts. A tensor’s shape describes its capacity, not the number of returns in this frame.If invalid points are included, check the
VALIDbit (0x40) inFlagsbefore using an entry. See Sensor Outputs.
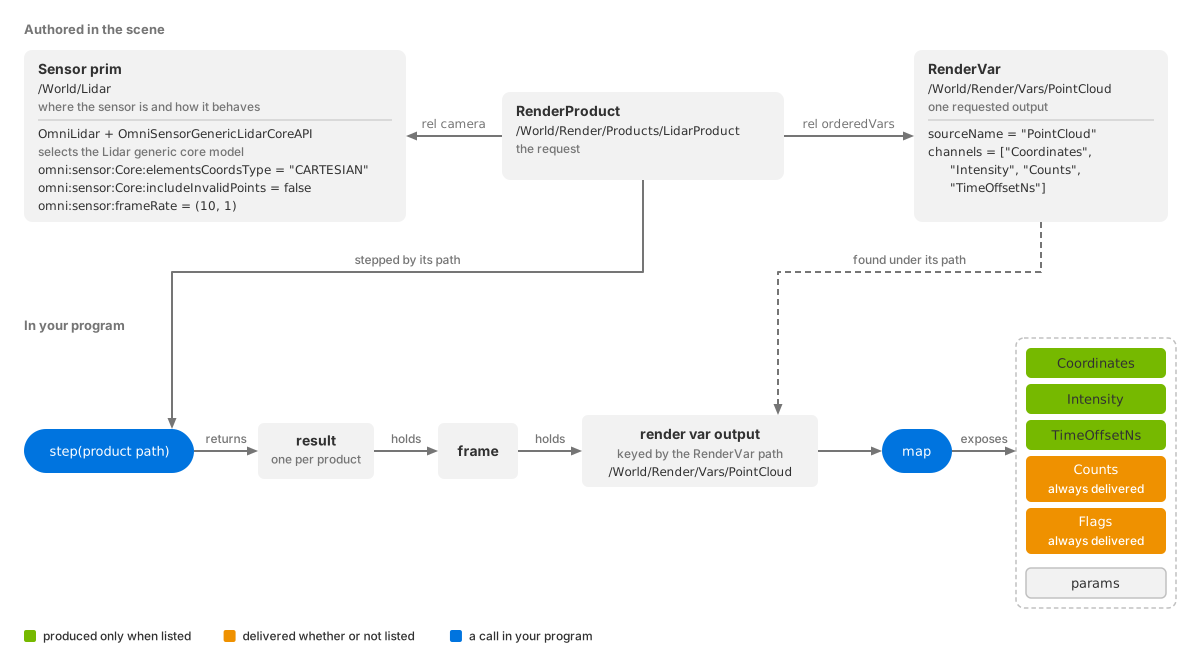
Configure the sensor and requested output in USD. Then step the RenderProduct, find the output by its RenderVar path and map its tensors.#
The scene#
Both examples use lidar_example.usda, a Z-up scene measured in meters:
Lidar at
(0, 0, 1), looking along world +X.Ground plane from -200 to 200 m along both X and Y.
A 1.5 m cube centered at
(10, 0, 0.75), resting on the ground.
The ground and cube have non-visual material labels asphalt and
concrete. These determine their lidar response; no visual surface shader
is needed. See Non-Visual Sensor Materials.
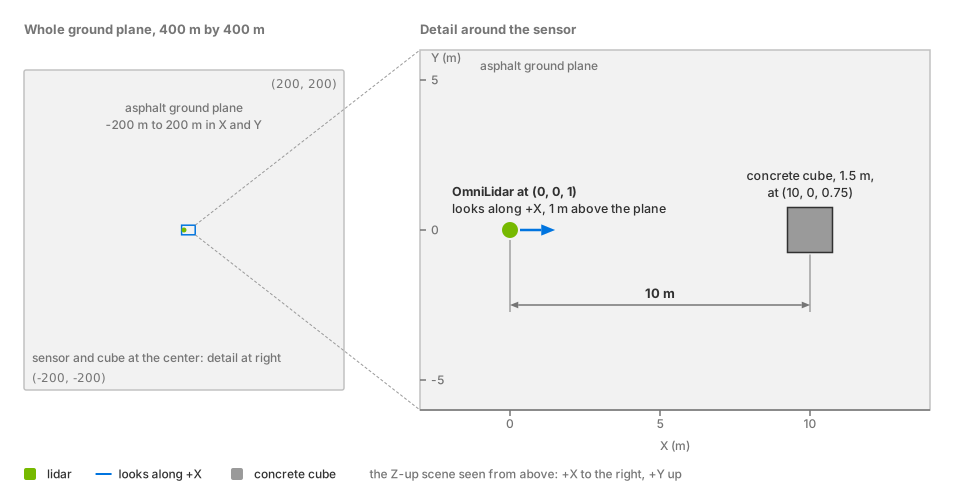
The example scene from above: the lidar one meter above the origin, looking along +X at the cube ten meters ahead, on a 400 m by 400 m ground plane.#
Render the sensor#
Create the renderer, load the USD scene into an attached ovstage stage, then step the product and read its output.
Create the renderer#
The renderer is created once, before any scene is loaded. The highlighted line enables the motion BVH.
main.py, from the runnable Python lidar example## Enable motion BVH: without it the lidar traces every ray from its end-of-frame pose.
log_file_path = None
if args.log is not None:
args.log.parent.mkdir(parents=True, exist_ok=True)
log_file_path = str(args.log)
renderer = ovrtx.Renderer(
ovrtx.RendererConfig(
log_file_path=log_file_path,
log_level="info",
motion_bvh=ovrtx.MotionBvh.ENABLE,
)
)
stage = ovstage.Stage("ovrtx.example.lidar")
renderer.attach_ovstage(stage)
main.cpp, from the runnable C lidar example#// The STATIC ovrtx loader resolves the ${executable_dir} token to the running
// executable's directory; ovrtx_setup_runtime() links the package bin beside
// the exe as "ovrtx/", which we hand the loader as the binary package root.
ovx_string_t ovrtx_package_root = {
OVX_CONFIG_EXECUTABLE_DIR_TOKEN "/ovrtx",
sizeof(OVX_CONFIG_EXECUTABLE_DIR_TOKEN "/ovrtx") - 1};
// Enable motion BVH: without it the lidar traces every ray from its
// end-of-frame pose. Sensor output fetch/map stays on the ovrtx APIs; ovstage
// only takes over scene ingest and drives stepping via ovrtx_step_with_stage.
ovrtx_config_entry_t config_entries[] = {
ovrtx_config_entry_binary_package_root_path(ovrtx_package_root),
ovrtx_config_entry_motion_bvh(OVRTX_MOTION_BVH_ENABLE),
};
ovrtx_config_t config = { config_entries, 2 };
// Create the renderer before attaching a stage or populating the scene.
result = ovrtx_create_renderer(&config, &renderer);
if (!check_api_result(result, "create_renderer")) {
return 1;
}
Enable the motion BVH when creating the renderer. See Motion BVH for sensor requirements and Motion Artifacts for its effect on lidar.
The Python snippet also attaches an ovstage stage and optionally sets a log file. The C snippet sets the renderer’s binary package location; it creates and attaches the stage in the next step.
Load the scene#
The scene goes into the attached stage, not into the renderer directly.
# The USDA scene defines the lidar, material bindings, and render product.
print(f"Loading lidar scene from {args.scene}...")
ordinal = 1
ovstage.population.open_usd(stage, str(args.scene), ordinal=ordinal)
stage.advance_write_floor(ordinal, ovstage.Scope.ALL).wait()
// Initialize the STATIC ovstage loader with its package root, mirroring the
// ovrtx setup above. ovstage_setup_runtime() links the package bin beside the
// exe as "ovstage/" (next to "ovrtx/"). ovrtx_create_renderer() already loaded
// the shared usd_ms runtime; ovstage.dll loads lazily on the first ovstage
// call and reuses it.
ovx_string_t ovstage_package_root = {
    OVX_CONFIG_EXECUTABLE_DIR_TOKEN "/ovstage",
    sizeof(OVX_CONFIG_EXECUTABLE_DIR_TOKEN "/ovstage") - 1};
ovstage_config_entry_t stage_config_entries[] = {
    ovstage_config_entry_binary_package_root_path(ovstage_package_root),
};
ovstage_config_t stage_config {};
stage_config.entries = stage_config_entries;
stage_config.entry_count =
    sizeof(stage_config_entries) / sizeof(stage_config_entries[0]);
ovstage_api_status_t stage_init_status = ovstage_initialize(&stage_config);
if (stage_init_status != OVSTAGE_OK) {
    print_ovstage_error(nullptr, stage_init_status, "initialize");
    return cleanup(1);
}

// Create the ovstage instance and attach it to the renderer.
ovstage_instance_desc_t stage_desc {};
stage_desc.name = "lidar";
ovstage_api_status_t stage_result = ovstage_create_instance(&stage_desc, &stage);
if (stage_result != OVSTAGE_OK) {
    print_ovstage_error(stage, stage_result, "create_instance");
    return cleanup(1);
}

result = ovrtx_attach_ovstage(renderer, stage);
if (!check_api_result(result, "attach_ovstage")) {
    return cleanup(1);
}
stage_attached = true;

// Populate the stage from the local USD file at our ordinal, then commit the
// write floor so the attached renderer can see it.
std::cout << "Loading lidar scene from " << sceneFilePath << "...\n";
ovstage_population_enqueue_result_t populate_result =
    ovstage_population_open_usd_from_file(stage,
                                          to_ovx_string(sceneFilePath),
                                          stage_ordinal,
                                          /* time = */ 0.0,
                                          OVSTAGE_POPULATION_DOMAIN_RENDERING);
if (wait_population_op(stage, populate_result, "population_open_usd_from_file") ||
    commit_ovstage_ordinal(stage, stage_ordinal)) {
    return cleanup(1);
}
Load the scene at an ordinal, then advance the stage’s write floor to make
those changes visible to the renderer. Render that same ordinal with
Renderer.step(..., ordinal=...) in Python or ovrtx_step_with_stage in C.
See ovstage Integration and Application Flow
for the update lifecycle.
Warm up and step#
Run three warm-up steps before reading the output. See Output Configuration for warm-up guidance.
# Warm up the sensor before reading the point cloud frame.
for _ in range(WARMUP_STEPS):
    renderer.step(render_products={RENDER_PRODUCT}, delta_time=STEP_DT_SECONDS, ordinal=ordinal)
// Render a few warmup frames without reading outputs. In attach mode we drive
// the renderer with ovrtx_step_with_stage(), rendering the ordinal we
// committed above.
for (int i = 0; i < kWarmupStepCount; ++i) {
    ovrtx_step_result_handle_t warmup_handle{};

    enqueue_result =
        ovrtx_step_with_stage(renderer,
                              render_products,
                              kStepDeltaTimeSeconds,
                              stage_ordinal,
                              &warmup_handle);
    if (!check_api_result(enqueue_result, "step") ||
        !wait_for_success(renderer, enqueue_result.op_index, "step")) {
        destroy_step_results(renderer, &warmup_handle);
        return cleanup(1);
    }
    if (!destroy_step_results(renderer, &warmup_handle)) {
        return cleanup(1);
    }
}
Step once more to capture a frame. Python passes the first frame to the
reader below. C fetches the result, finds PointCloud, maps it to the CPU,
calls its reader and unmaps it.
# Render one lidar frame, summarize scalar channels, and color points by intensity.
products = renderer.step(
    render_products={RENDER_PRODUCT}, delta_time=STEP_DT_SECONDS, ordinal=ordinal
)
frame = products[RENDER_PRODUCT].frames[0]
points, intensity, time_offset_ns = read_lidar_pointcloud(frame)

if len(points) == 0:
    print("valid points=0")
    del frame, products
    renderer.detach_ovstage()
    stage.destroy()
    renderer.destroy()
    return

print(
    f"valid points={len(points)}, "
    f"mean intensity={float(np.mean(intensity))}, "
    f"max time offset={int(np.max(time_offset_ns))} ns"
)
if rr is not None:
    log_lidar_points(rr, points, intensity)
ovrtx_step_result_handle_t step_handle{};

// Render one lidar frame from the committed ordinal and keep the result
// handle for fetching.
enqueue_result =
    ovrtx_step_with_stage(renderer,
                          render_products,
                          kStepDeltaTimeSeconds,
                          stage_ordinal,
                          &step_handle);
if (!check_api_result(enqueue_result, "step") ||
    !wait_for_success(renderer, enqueue_result.op_index, "step")) {
    destroy_step_results(renderer, &step_handle);
    return cleanup(1);
}

// Fetch the completed step and locate the PointCloud render variable.
ovrtx_render_product_set_outputs_t outputs = {};
result = ovrtx_fetch_results(
    renderer, step_handle, ovrtx_timeout_infinite, &outputs);
if (!check_api_result(result, "fetch_results")) {
    destroy_step_results(renderer, &step_handle);
    return cleanup(1);
}

ovrtx_render_var_output_handle_t pointcloud_handle =
    find_render_var_output(outputs, kPointCloudRenderVarPath);
if (pointcloud_handle == OVRTX_INVALID_RENDER_VAR_OUTPUT_HANDLE) {
    std::cerr << "PointCloud render var output not found\n";
    destroy_step_results(renderer, &step_handle);
    return cleanup(1);
}

// Map the composite PointCloud render variable to CPU. The mapped output
// exposes one DLTensor per channel requested in the USD.
ovrtx_map_output_description_t map_desc = {};
map_desc.device_type = OVRTX_MAP_DEVICE_TYPE_CPU;
ovrtx_render_var_output_t pointcloud_output = {};
result = ovrtx_map_render_var_output(renderer,
                                     pointcloud_handle,
                                     &map_desc,
                                     ovrtx_timeout_infinite,
                                     &pointcloud_output);
if (!check_api_result(result, "map_render_var_output")) {
    destroy_step_results(renderer, &step_handle);
    return cleanup(1);
}

const bool printed_summary = print_pointcloud_summary(pointcloud_output);

// Always unmap after reading the CPU DLTensor views.
ovrtx_cuda_sync_t no_sync = {};
result = ovrtx_unmap_render_var_output(
    renderer, pointcloud_output.map_handle, no_sync);
if (!check_api_result(result, "unmap_render_var_output") ||
    !printed_summary) {
    destroy_step_results(renderer, &step_handle);
    return cleanup(1);
}

if (!destroy_step_results(renderer, &step_handle)) {
    return cleanup(1);
}
Step the RenderProduct path. Each product returns a result containing frames; each frame contains outputs keyed by RenderVar path. Map an output before reading its tensors.
For multiple products or capture rates, see Output Configuration and Sensor Scheduling. Mapping modes are described in Sensor Outputs.
Warning
In C, destroy every step result, the warm-up results included (Sensor Outputs, Lifetime and ownership). In Python there is nothing to destroy.
Read the output#
The Python reader maps the output and reads the requested channels.
The C reader receives an already-mapped output and reads Counts,
Intensity and TimeOffsetNs. It skips Coordinates because it only
prints statistics.
def read_lidar_pointcloud(frame) -> tuple[np.ndarray, np.ndarray, np.ndarray]:
    """Map the PointCloud composite tensor to CPU and return valid point channels."""
    with frame.render_vars[POINTCLOUD_RENDER_VAR].map(device=ovrtx.Device.CPU) as pointcloud:
        coordinates = np.from_dlpack(pointcloud["Coordinates"])
        counts = np.from_dlpack(pointcloud["Counts"])
        intensity = np.from_dlpack(pointcloud["Intensity"])
        time_offset_ns = np.from_dlpack(pointcloud["TimeOffsetNs"])

        # Counts bounds the delivered entries. This scene sets
        # includeInvalidPoints=false, so the delivered entries are all valid.
        valid_count = int(counts[0])
        points = np.asarray(coordinates[:, :valid_count].T)
        return (
            points.copy(),
            np.asarray(intensity[:valid_count]).copy(),
            np.asarray(time_offset_ns[:valid_count]).copy(),
        )
// Read one mapped lidar PointCloud. Counts bounds the delivered entries. The
// scene sets includeInvalidPoints=false, so the delivered entries are valid.
bool print_pointcloud_summary(ovrtx_render_var_output_t const& output)
{
    // The USD also requests Coordinates; this example only needs scalar and
    // time channels for the printed statistics.
    int32_t const* counts_data = cpu_tensor_data<int32_t>(output, "Counts");
    float const* intensity_data = cpu_tensor_data<float>(output, "Intensity");
    int32_t const* time_offset_data =
        cpu_tensor_data<int32_t>(output, "TimeOffsetNs");

    if (!counts_data || !intensity_data || !time_offset_data) {
        return false;
    }

    // With invalid returns dropped by the scene, Counts is also the valid-point
    // count.
    int32_t const valid_point_count = counts_data[0];
    if (valid_point_count <= 0) {
        std::cerr << "Expected at least one valid lidar point, got "
                  << valid_point_count << "\n";
        return false;
    }

    double intensity_sum = 0.0;
    int32_t max_time_offset_ns = time_offset_data[0];

    // Only the first Counts entries are delivered in each per-point channel.
    for (int32_t i = 0; i < valid_point_count; ++i) {
        const float intensity = intensity_data[i];
        if (!std::isfinite(intensity)) {
            std::cerr << "Intensity tensor contained a non-finite value\n";
            return false;
        }
        intensity_sum += intensity;
        max_time_offset_ns = std::max(max_time_offset_ns, time_offset_data[i]);
    }

    const double mean_intensity =
        intensity_sum / static_cast<double>(valid_point_count);
    std::cout << "valid points=" << valid_point_count
              << ", mean intensity=" << mean_intensity
              << ", max point time offset to point cloud frame start=" << max_time_offset_ns << " ns\n";
    return true;
}
Read tensors by their exact channel names. Python uses NumPy’s DLPack
support; C reads DLTensor data through helpers included with the example.
The mapped output also exposes params.
Both readers use Counts[0] to limit per-point reads. Neither checks
Flags because this scene sets includeInvalidPoints = false.
See Reading the output for reading clouds
that retain invalid points.
The Python expression coordinates[:, :valid_count].T converts the
component-first coordinates into one row per point. Copies are optional in
Python but required in C if the data must outlive the mapping. See
Lifetime and ownership.
Display the output#
The Python example displays points in Rerun, colored by Intensity.
Both examples print the point count, mean intensity and maximum time offset.
Python prints:
valid points=..., mean intensity=..., max time offset=... ns
C labels the last value max point time offset to point cloud frame start.
Expect a nonzero point count for this scene; the exact count varies between
runs. See why counts vary.
If no points are returned, Python prints valid points=0 and C exits with
an error.
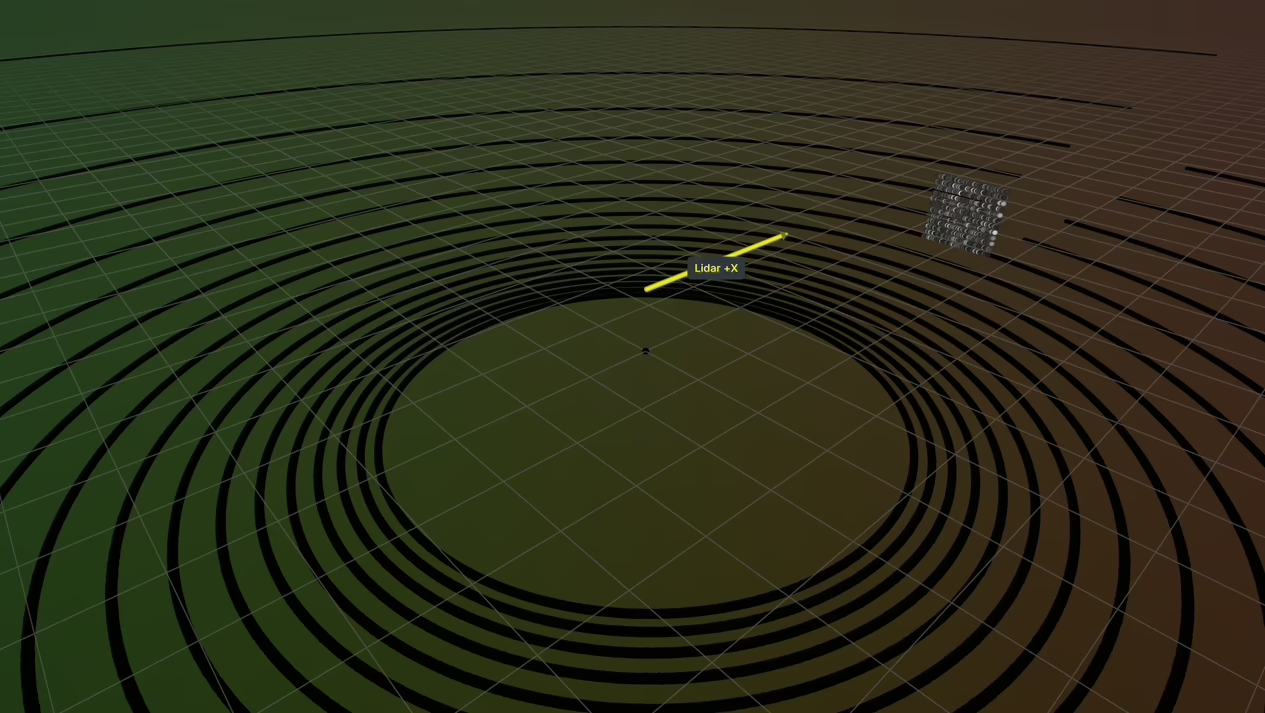
The point cloud of lidar_example.usda as the Python example shows it,
each point shaded by its Intensity.#
Next steps#
Run the complete examples:
Radar: Python or C. These use the Radar generic wpmDmat model with a moving target and multiple ordinals.
Acoustic: Python. This reads one
SignalWaysframe from the Acoustic generic wpm model.
All three examples enable the motion BVH. Both AUTO and ENABLE support
radar motion effects and acoustic simulation. See
Motion BVH.
To customize the lidar, see its attributes and how-tos. The tutorials build profiles from vendor datasheets. Use Sensor Definition Validation to check sensor definitions before rendering.
Try a richer scene#
Both examples also ship lidar_example_panels.usda. It uses the same
sensor settings and output request, with the lidar 1.5 m above asphalt:
Ahead: glass at 3 m, with a concrete wall behind it at 6 m.
Right: a silver panel at 3 m.
Left: a wide concrete wall at 4 m.
Behind: a concrete panel at 3 m.
Materials have both visual shaders and non-visual labels: asphalt,
concrete, clear_glass and silver. See Non-Visual Sensor Materials.
The scene also has a preview camera and CameraProduct; the lidar example
does not step that product.
Select the scene with Python’s --scene option, or pass its path as the
C example’s first argument. No code changes are needed.
cd examples/python/lidar
uv run main.py --scene lidar_example_panels.usda
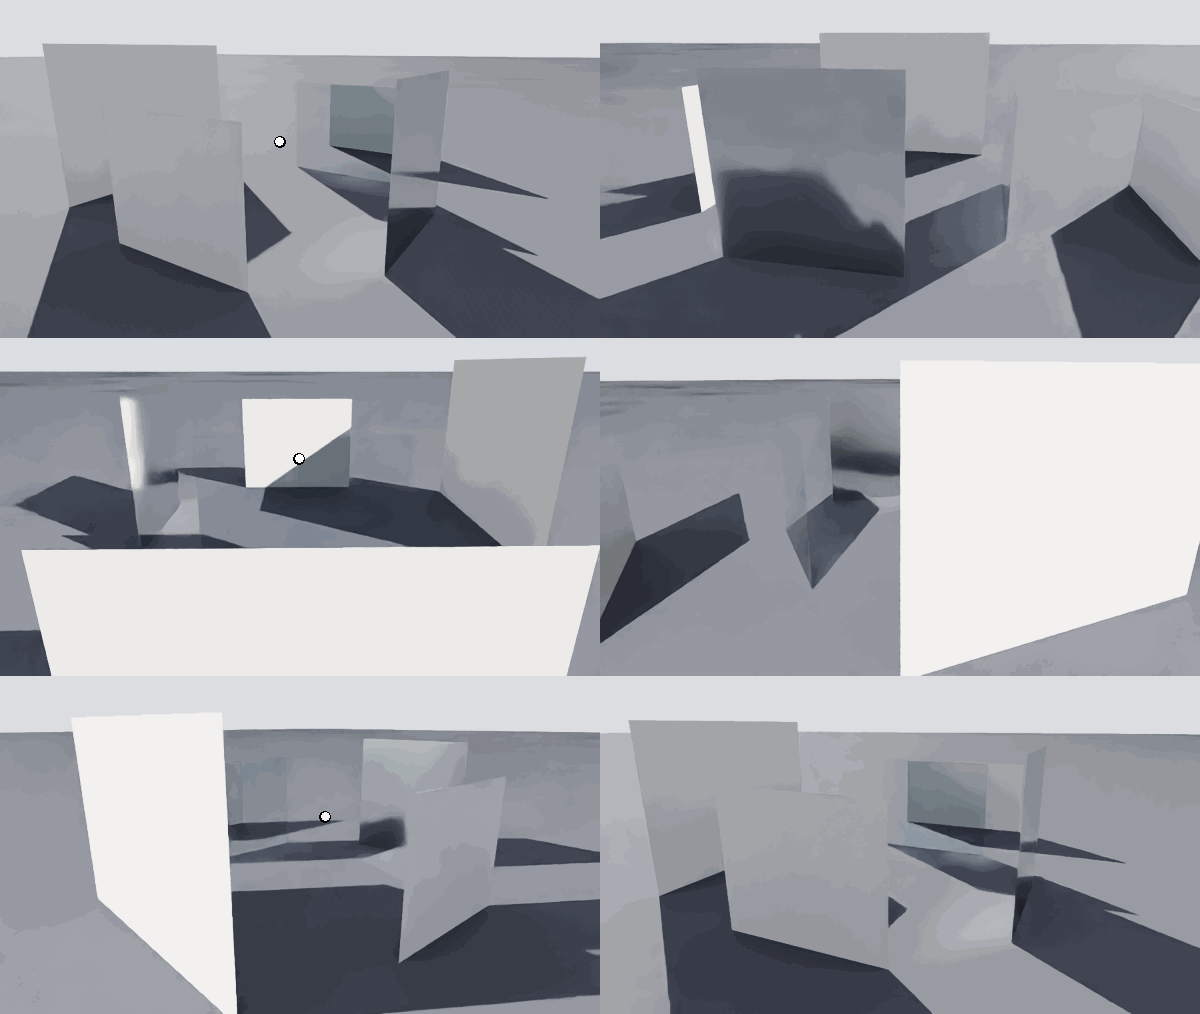
|
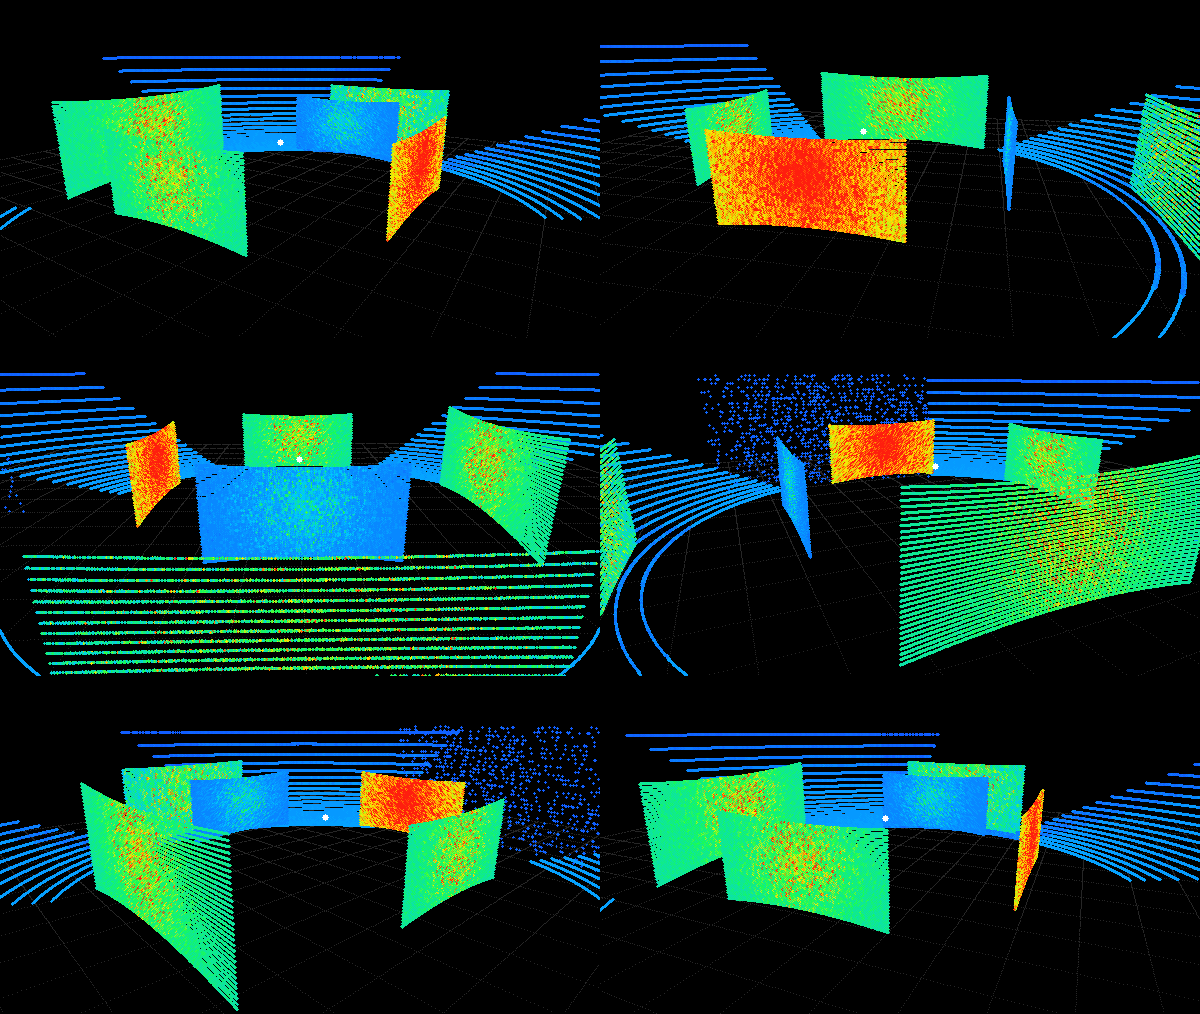
|
Left: the scene viewed from a camera circling the lidar. Right: one lidar
scan from the same viewpoints, colored by Intensity. White marks the lidar.
The sparse points beyond the silver panel are reflections of the concrete wall.
A sample run returned about 440,000 valid points:
valid points=441505, mean intensity=0.3046911656856537, max time offset=99996722 ns
The exact count varies between runs.