

Output Configuration#
A RenderProduct selects a sensor and the outputs to produce. Its camera
relationship targets the sensor prim; orderedVars lists the RenderVars to
return. Each RenderVar selects an output through sourceName.
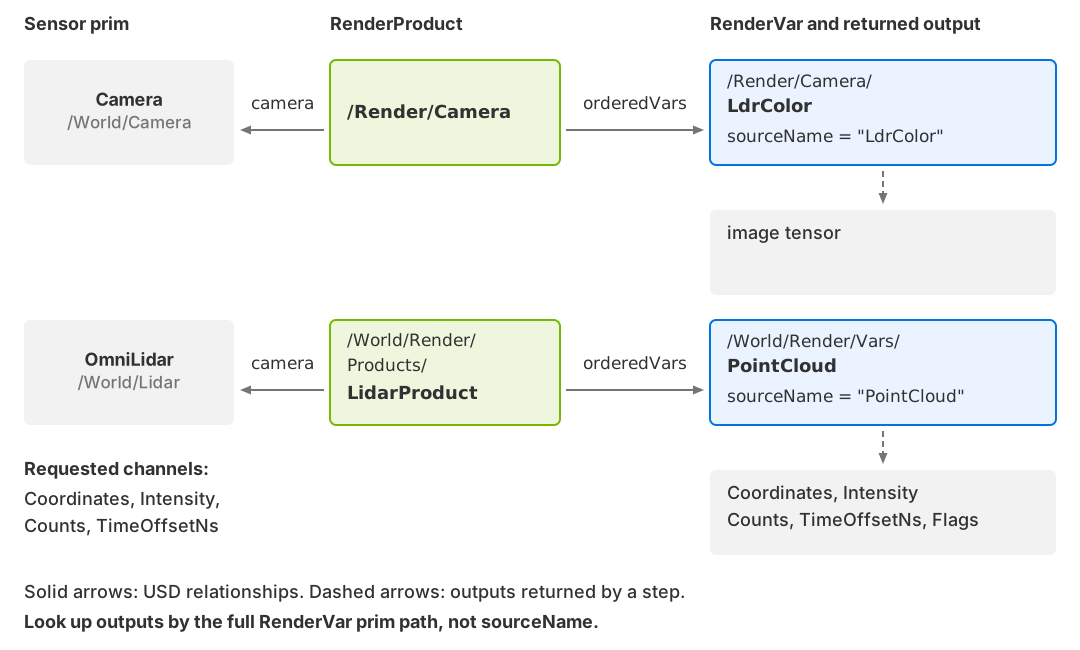
RenderProducts connect sensors to requested outputs. A composite output contains several named tensors, called channels.#
Object |
Purpose |
|---|---|
RenderProduct |
Selects one sensor, or several supported sensors for tiled output. Holds the output list, resolution and product settings. |
RenderVar |
Requests an image such as LdrColor, or a
composite output: |
Channel |
A named tensor inside a composite output, with its own type, shape and units. See the Glossary for the other meanings of “channel” on model pages. |
A product returns only its listed RenderVars. Composite outputs contain the requested channels plus any the model always includes. Author these prims in the scene file or add them at run time.
RenderProduct#
This product requests LdrColor from the Camera prim
at /World/Camera at 1920 × 1080. Its RenderVar is a child of the product.
#usda 1.0
def "Render" {
    def RenderProduct "Camera" {
        int2 resolution = (1920, 1080)
        rel camera = </World/Camera>
        rel orderedVars = [<LdrColor>]

        def RenderVar "LdrColor" {
            string sourceName = "LdrColor"
        }
    }
}
from pxr import Gf, UsdRender

render_scope = stage.DefinePrim("/Render")
camera_product = UsdRender.Product.Define(stage, "/Render/Camera")
camera_product.GetResolutionAttr().Set(Gf.Vec2i(1920, 1080))
camera_product.GetCameraRel().SetTargets(["/World/Camera"])

ldr_var = UsdRender.Var.Define(stage, "/Render/Camera/LdrColor")
ldr_var.GetSourceNameAttr().Set("LdrColor")

camera_product.GetOrderedVarsRel().SetTargets(["/Render/Camera/LdrColor"])
The rel camera relationship#
Despite its name, camera targets a USD Camera prim, or an OmniLidar,
OmniRadar, OmniAcoustic or OmniGeneralSensor prim with its model schema applied. See
Sensor Configuration for creating those prims.
Tiling#
For models that support tiling, listing several sensors in camera batches
their work into one RenderProduct to improve throughput. The output layout and
shared configuration depend on the model:
Cameras: each camera occupies one tile of a single output image. Use this when you only require very small images and can pack many of them into a single frame, which increases throughput. See Python: Tiled rendering.
Lidar wpm: the product returns one aggregate point cloud, with a separate range of points for each sensor. The first sensor supplies the shared configuration; each sensor retains its own pose and motion. See Tile Lidars and its Outputs page.
Generic wpm: the contribution layout has a tile axis. The first sensor supplies the shared configuration; each sensor supplies its own pose and motion. See Generic wpm Outputs.
Lidar core: tiling is not supported. Use one RenderProduct per sensor.
For separate outputs, use independent products. For USD relationship syntax, see Relationships.
The rel orderedVars relationship#
orderedVars targets the RenderVar prims to produce. List several RenderVars
to request several outputs from one sensor. Each target must define its own
sourceName.
RenderVars can be children of the product, as above, or live in a shared scope. Independent RenderProducts shows two products sharing one RenderVar.
RenderVar#
A RenderVar’s prim path identifies its output in the results of a step.
Its sourceName selects the output to produce. For example, the RenderVar
above requests LdrColor and appears in results as /Render/Camera/LdrColor.
See Camera Outputs for image source names.
Use each model’s Outputs page for its source names and channel rules: Lidar core, Lidar wpm, Radar wpmDmat and Acoustic wpm.
The default sourceType selects a built-in output by name.
With sourceType = "lpe", sourceName instead contains a light path
expression. This is available in Path Tracing mode; see
Light Path Expressions.
Each returned output contains zero or more named tensors and parameters. Sensor Outputs explains how to find it by its full RenderVar path and map its contents in Python and C.
Requesting channels#
For a PointCloud RenderVar, author token[] channels to select the tensors
you need. This attribute is declared by RenderVarChannelsAPI; the renderer
reads it even if that API is not applied. Its default is an empty list. Use
token[]: a string[] value yields no channels.
Each RenderVar has its own channel list. Several RenderVars in one product can
request PointCloud with different lists, reducing memory use when consumers
need different subsets.
Model/output |
Channel selection |
|---|---|
Lidar core and radar |
Return the requested channels plus |
Lidar wpm |
An empty list requests all channels. |
Acoustic |
Always returns all its channels; it takes no channel list. |
Generic wpm |
One RenderVar per product. An empty list requests the default channels.
|
For PointCloud, Counts reports how many entries were delivered;
Flags indicates validity.
See Sensor Outputs for reading them. Check channel names and case against
the model’s Outputs page before indexing the result.
This lidar example requests Coordinates, Intensity, Counts and
TimeOffsetNs. Its product references a RenderVar in a shared Vars scope:
#usda 1.0
def Xform "World" {
    def "Render"
    {
        def "Products"
        {
            def RenderProduct "LidarProduct"
            {
                rel camera = </World/Lidar>
                rel orderedVars = [<../../Vars/PointCloud>]
            }
        }

        def "Vars"
        {
            def RenderVar "PointCloud"
            {
                uniform string sourceName = "PointCloud"
                token[] channels = [
                    "Coordinates",
                    "Intensity",
                    "Counts",
                    "TimeOffsetNs"
                ]
            }
        }
    }
}
from pxr import Sdf, UsdRender

# Keep the output definition separate so other products can share it.
product = UsdRender.Product.Define(stage, "/World/Render/Products/LidarProduct")
product.GetCameraRel().SetTargets(["/World/Lidar"])
output = UsdRender.Var.Define(stage, "/World/Render/Vars/PointCloud")
output.GetSourceNameAttr().Set("PointCloud")
# channels must be token[], not string[].
output.GetPrim().CreateAttribute(
    "channels", Sdf.ValueTypeNames.TokenArray, custom=False
).Set(["Coordinates", "Intensity", "Counts", "TimeOffsetNs"])
product.GetOrderedVarsRel().SetTargets([output.GetPath()])
The radar examples request Coordinates, Counts and RadialVelocityMs;
the C example also requests RCS. The model adds Flags automatically.
See Radar Outputs.
Independent RenderProducts#
Create one RenderProduct per sensor when each sensor needs its own output
variables, resolution, stepping, device pinning
(RenderProduct device pinning) or result handling.
The products can still share their RenderVars: here two camera products reference
one LdrColor RenderVar in a Vars scope.
#usda 1.0
def "Render" {
    def RenderProduct "FrontCamera" {
        rel camera = </World/FrontCamera>
        rel orderedVars = [<../Vars/LdrColor>]
    }

    def RenderProduct "RearCamera" {
        rel camera = </World/RearCamera>
        rel orderedVars = [<../Vars/LdrColor>]
    }

    def "Vars" {
        def RenderVar "LdrColor" {
            string sourceName = "LdrColor"
        }
    }
}
from pxr import UsdRender

render_scope = stage.DefinePrim("/Render")

front_product = UsdRender.Product.Define(stage, "/Render/FrontCamera")
front_product.GetCameraRel().SetTargets(["/World/FrontCamera"])
front_product.GetOrderedVarsRel().SetTargets(["/Render/Vars/LdrColor"])

rear_product = UsdRender.Product.Define(stage, "/Render/RearCamera")
rear_product.GetCameraRel().SetTargets(["/World/RearCamera"])
rear_product.GetOrderedVarsRel().SetTargets(["/Render/Vars/LdrColor"])

vars_scope = stage.DefinePrim("/Render/Vars")
ldr_var = UsdRender.Var.Define(stage, "/Render/Vars/LdrColor")
ldr_var.GetSourceNameAttr().Set("LdrColor")
Pass every active RenderProduct path on each step, including sensors that have
no completed output yet. Sensor Scheduling explains the scheduling requirements.
This example steps both products using a Python set of paths or a C
ovrtx_render_product_set_t:
products = renderer.step(
    render_products={"/Render/FrontCamera", "/Render/RearCamera"},
    delta_time=1.0 / 60,
    ordinal=ordinal,
)
ovx_string_t rp_paths[] = {
    {"/Render/FrontCamera", strlen("/Render/FrontCamera")},
    {"/Render/RearCamera",  strlen("/Render/RearCamera")},
};
ovrtx_render_product_set_t render_products = {};
render_products.render_products = rp_paths;
render_products.num_render_products = 2;

ovrtx_step_result_handle_t step_handle{};
ovrtx_enqueue_result_t enqueue_result = ovrtx_step_with_stage(
    renderer_, render_products, 1.0 / 60.0, ordinal, &step_handle);
Adding RenderProducts at run time#
To add output configuration without editing the scene file, sublayer that file
beneath an inline root layer containing the new RenderProducts and RenderVars.
Populate the root layer through ovstage.population.open_usd_from_string()
in Python or ovstage_population_open_usd_from_string() in C.
These snippets add LdrColor and HdrColor outputs and publish the stage write. The Python snippet also steps the new product:
import ovstage

ovstage.population.open_usd_from_string(stage, f'''
#usda 1.0
(
    subLayers = [
        @{scene_path}@
    ]
)

def "Render" {{
    def RenderProduct "Camera" {{
        int2 resolution = (1920, 1080)
        rel camera = </Camera0>
        rel orderedVars = [<LdrColor>, <HdrColor>]

        def RenderVar "LdrColor" {{
            string sourceName = "LdrColor"
        }}

        def RenderVar "HdrColor" {{
            string sourceName = "HdrColor"
        }}
    }}
}}
''', ordinal=ordinal)
stage.advance_write_floor(ordinal, ovstage.Scope.ALL).wait()

products = renderer.step(
    render_products={"/Render/Camera"},
    delta_time=1.0 / 60,
    ordinal=ordinal,
)
    // Compose a docs-owned render-config layer on top of a scene layer via
    // USD sublayers. The composed root gets populated into the attached
    // ovstage in one call.
    std::string scene_path = get_test_data_dir() + "/simple_camera.usda";
    std::string usda = make_sublayer_usda(scene_path, R"usda(
def "Render" {
    def RenderProduct "Camera" {
        int2 resolution = (640, 480)
        rel camera = </Camera0>
        rel orderedVars = [<LdrColor>, <HdrColor>]

        def RenderVar "LdrColor" {
            string sourceName = "LdrColor"
        }

        def RenderVar "HdrColor" {
            string sourceName = "HdrColor"
        }
    }
}
)usda");
    ovstage_population_enqueue_result_t pr = ovstage_population_open_usd_from_string(
        stage_,
        {usda.c_str(), usda.size()},
        /*ordinal=*/1,
        /*time=*/NAN,
        OVSTAGE_POPULATION_DOMAIN_RENDERING);
    ASSERT_EQ(pr.status, OVSTAGE_OK) << format_ovstage_population_last_error();
    docs_wait_ovstage_population_no_errors(stage_, pr.op_index);
    docs_ovstage_advance_write_floor(stage_, 1);
Tip
Use the stage-population reference functions only when you need removable
referenced content after a root stage is already open. For one composed root
stage, prefer the inline subLayers pattern shown above.
You can also add a sensor in the same layer. This example adds a Camera with
OmniSensorGenericCameraCoreAPI and a product requesting
LdrColor. The sublayer path is relative to the new root
layer; the Python tab assumes a file-backed stage in the same directory:
#usda 1.0
(
    subLayers = [
        @../../data/ovrtx-test-base.usda@
    ]
)

def Camera "DocsCamera" (
    prepend apiSchemas = ["OmniSensorGenericCameraCoreAPI"]
)
{
}

def "Render"
{
    def RenderProduct "DocsCamera"
    {
        rel camera = </DocsCamera>
        rel orderedVars = [<LdrColor>]

        def RenderVar "LdrColor"
        {
            string sourceName = "LdrColor"
        }
    }
}
from pxr import Sdf, UsdGeom, UsdRender

# The existing scene is weaker than the new root-layer configuration.
stage.GetRootLayer().subLayerPaths.append("../../data/ovrtx-test-base.usda")
camera = UsdGeom.Camera.Define(stage, "/DocsCamera")
camera.GetPrim().SetMetadata("apiSchemas", Sdf.TokenListOp.Create(
    prependedItems=["OmniSensorGenericCameraCoreAPI"]
))
product = UsdRender.Product.Define(stage, "/Render/DocsCamera")
product.GetCameraRel().SetTargets([camera.GetPath()])
output = UsdRender.Var.Define(stage, "/Render/DocsCamera/LdrColor")
output.GetSourceNameAttr().Set("LdrColor")
product.GetOrderedVarsRel().SetTargets([output.GetPath()])
This is also how you override a sensor’s parameters without editing the file that defines it; Sensor Configuration covers overrides. For how an attached stage orders writes and renders through ordinals, see ovstage Integration.
Product-level controls#
RenderProducts carry render settings, warm-up requirements and GPU device allow-lists. A few global settings belong on a RenderSettings prim instead. For settings specific to a camera render mode, see Render Modes.
Render settings#
Render settings are RenderProduct attributes in the omni:rtx: namespace.
For example, omni:rtx:rendermode selects the mode and
omni:rtx:rtpt:maxBounces limits bounces in
Real-Time Path Tracing.
See Render Modes for each mode’s settings.
These snippets update maxBounces through the runtime stage. Its USD type is
uint, so the Python code writes one uint32 with is_array=False;
the C code passes a DLTensor containing one uint32. After changing a
setting, call reset() or ovrtx_reset() and
warm up before capturing.
Write the setting through an ovstage query at a new ordinal, then publish the write by advancing the write floor:
stage.write_attribute(
    query,
    attribute,
    ordinal=ordinal,
    tensors=np.array([max_bounces], dtype=np.uint32),
    is_array=False,
).wait()
stage.advance_write_floor(ordinal, ovstage.Scope.ALL).wait()
Query the product with ovstage_query_from_path_list and write the
attribute with ovstage_write_attribute, passing a DLTensor that holds
the value:
// Author a render setting on the RenderProduct prim by writing the
// attribute through ovstage. omni:rtx:rtpt:maxBounces is a uint32
// scalar.
path_dictionary_instance_t* pd = ovstage_get_path_dictionary(stage_);
ovx_string_t prim_path = ovx_str("/Render/Camera");
ovx_primpath_list_t path_list{};
ASSERT_EQ(
    path_dictionary_create_path_list_from_strings(pd, &prim_path, 1, &path_list).status,
    OVX_API_SUCCESS);
ovstage_query_handle_t query_handle = OVSTAGE_INVALID_QUERY_HANDLE;
ASSERT_EQ(ovstage_query_from_path_list(stage_, path_list, &query_handle), OVSTAGE_OK);

ovx_string_t attr_str = ovx_str("omni:rtx:rtpt:maxBounces");
ovx_token_t attr_token{};
ASSERT_EQ(path_dictionary_create_tokens_from_strings(pd, &attr_str, 1, &attr_token).status,
          OVX_API_SUCCESS);

uint32_t value = static_cast<uint32_t>(max_bounces);
int64_t write_shape[1] = {1};
DLTensor write_tensor{};
write_tensor.data = &value;
write_tensor.device = {kDLCPU, 0};
write_tensor.ndim = 1;
write_tensor.dtype = {kDLUInt, 32, 1};
write_tensor.shape = write_shape;

ovstage_write_data_t write_data{};
write_data.tensors = &write_tensor;
write_data.tensor_count = 1;
write_data.is_array = false;

ovx_token_or_string_t attr_ref{};
attr_ref.token = attr_token;

ovstage_enqueue_result_t wq = ovstage_write_attribute(
    stage_, query_handle, attr_ref, ordinal, write_data, OVSTAGE_PRIM_MODE_UPSERT);
ASSERT_EQ(wq.status, OVSTAGE_OK) << format_ovstage_last_error();
docs_wait_ovstage_no_errors(stage_, wq.op_index);
docs_ovstage_advance_write_floor(stage_, ordinal);

ovstage_release_query(stage_, query_handle);
path_dictionary_release_path_list_reference(pd, path_list);
Render settings can be updated while the renderer runs. See ovstage Integration for write ordering.
Settings on the RenderSettings prim#
A few settings are not RenderProduct attributes. They live on the stage’s
RenderSettings prim: the prim the stage’s renderSettingsPrimPath metadata
names, or, without that metadata, /Render/OmniverseGlobalRenderSettings.
renderingColorSpace, the color space that spectral rendering converts from and
to, is one such setting and carries no omni:rtx: prefix
(Spectral Rendering);
omni:rtx:pt:multigpu:enabled is another
(Path Tracing). The scene-partitioning switch
omni:rtx:scenePartitioning:showAllPartitionsByDefault is authored there too;
Scene Partitions explains it.
Warming up the renderer#
Run warm-up steps after loading a scene or changing settings before capturing output:
Texture streaming: early frames may use low-resolution mip levels while higher-resolution textures load.
Path tracing: early frames have fewer accumulated samples and more noise.
Sensor pipelines: the acoustic model’s first frames contain no echo data; see Startup frames.
Some camera examples use 40 warm-up frames as a starting point for streaming and convergence, not as a guarantee that loading or accumulation is complete. The lidar, radar and acoustic examples use three steps for pipeline startup; non-visual output does not converge through accumulated frames. The required warm-up depends on the scene and pipeline.
Warm up after populating a scene or adding a reference, after resetting the renderer, and after changes that invalidate accumulated samples, such as changing bounce counts. These snippets discard warm-up outputs before capture:
WARMUP_FRAMES = 40
for _ in range(WARMUP_FRAMES):
    renderer.step(render_products={"/Render/Camera"}, delta_time=1.0 / 60, ordinal=2)
// Warm up — step enough frames for texture streaming to finish loading
// high-res mips and for path tracing to converge to a good quality image.
ovx_string_t rp_path = ovx_str("/Render/Camera");
ovrtx_render_product_set_t render_products{};
render_products.render_products = &rp_path;
render_products.num_render_products = 1;

ovrtx_step_result_handle_t step_handle{};
int const WARMUP_FRAMES = 40;
for (int i = 0; i < WARMUP_FRAMES; ++i) {
    ovrtx_enqueue_result_t eq = ovrtx_step_with_stage(
        renderer_, render_products, 1.0 / 60.0, /*ordinal=*/2, &step_handle);
    ASSERT_API_SUCCESS(eq.status);
    docs_wait_no_errors(renderer_, eq.op_index);
    ovrtx_destroy_results(renderer_, step_handle);
}
Warning
Warm-up steps return results too; in C destroy each one (Sensor Outputs, Lifetime and ownership).
Texture streaming itself is a renderer-creation option, described under Renderer options sensors depend on.
RenderProduct device pinning#
A RenderProduct can be restricted to a list of CUDA-visible device indices. Author
the uint[] deviceIds attribute directly on the RenderProduct before loading the
stage.
deviceIds is an allow-list of indices after CUDA_VISIBLE_DEVICES has
filtered and remapped the process-visible GPUs. A singleton list such as [0]
constrains the product to CUDA-visible GPU 0; a list such as [0, 1] allows the
renderer to choose either visible device. This product is pinned to GPU 0:
#usda 1.0
def Scope "Render" {
    def RenderProduct "Camera"
    {
        rel camera = </World/Camera>
        uint[] deviceIds = [0]
        int2 resolution = (640, 320)
        rel orderedVars = <LdrColor>

        def RenderVar "LdrColor"
        {
            string sourceName = "LdrColor"
        }
    }
}
from pxr import Gf, Sdf, UsdRender

product = UsdRender.Product.Define(stage, "/Render/Camera")
product.GetCameraRel().SetTargets(["/World/Camera"])
# Indices refer to GPUs visible after CUDA_VISIBLE_DEVICES remapping.
product.GetPrim().CreateAttribute(
    "deviceIds", Sdf.ValueTypeNames.UIntArray, custom=False
).Set([0])
product.GetResolutionAttr().Set(Gf.Vec2i(640, 320))
output = UsdRender.Var.Define(stage, "/Render/Camera/LdrColor")
output.GetSourceNameAttr().Set("LdrColor")
product.GetOrderedVarsRel().SetTargets([output.GetPath()])
Use device pinning when:
A test or application must run a specific RenderProduct on a deterministic CUDA-visible device.
The renderer-level
active_cuda_gpuslist is broader than the device set allowed for one product. The two must be compatible; refer to Renderer Configuration.The product is used for picking. Picking runs on CUDA-visible GPU 0, so a product that serves pick queries must author
deviceIds = [0]; refer to Picking and Selection.
Renderer options sensors depend on#
Some settings must be chosen when creating the renderer. Python exposes them
through RendererConfig; C uses ovrtx_config_entry_* helpers.
Renderer Configuration documents the full configuration.
Motion BVH#
Motion BVH accounts for sensor and geometry motion at each ray’s time within a scan or exposure. Without it, lidar scans do not show motion distortion and rolling-shutter images do not show motion-induced skew.
Choose the mode when creating the renderer; changing it requires recreating the
renderer. Set RendererConfig.motion_bvh in Python or use
ovrtx_config_entry_motion_bvh() in C.
Mode |
Behavior |
|---|---|
|
Motion BVH stays off. |
|
Motion BVH stays on. |
|
Turns on when a stepped product targets a non-visual sensor or rolling-shutter camera; turns off when none does. |
Python uses MotionBvh.ENABLE or MotionBvh.AUTO; the C equivalents are
OVRTX_MOTION_BVH_ENABLE and OVRTX_MOTION_BVH_AUTO.
Which sensors need it:
The Radar generic wpmDmat model needs an active motion BVH for motion effects, with
AUTOorENABLE.The Acoustic generic wpm model needs an active motion BVH, with
AUTOorENABLE.The Lidar generic core model and the Lidar generic wpm model need it for motion effects, with
AUTOorENABLE; without it they still deliver points, each ray traced against a scene that does not move.The Generic wpm model uses an active motion BVH for sensor and geometry motion at its firing times. Use
AUTOorENABLE, as in its Python example.A rolling-shutter camera needs it too, with
AUTOorENABLE.
Use ENABLE for sensor workloads. The
lidar,
radar,
acoustic and
multi-rate examples use it;
the multi-rate example includes a rolling-shutter camera.
The motion BVH takes effect only on GPUs whose driver exposes ray-traced motion, all of them if the renderer uses several. Otherwise it stays off whichever mode you choose, and every sensor behaves as it does without it. The Motion BVH column of Hardware & Driver Requirements lists support by GPU architecture.
No output reports whether the motion BVH was active; a sensor delivers data either way. To confirm it, compare a run created with it against one created without, in a scene with motion. Motion Artifacts and Moving Targets walk through that comparison for a lidar and a radar.
The snippets create a renderer with AUTO, suitable for a scene whose
motion-dependent sensor is a rolling-shutter camera:
import ovrtx

config = ovrtx.RendererConfig(motion_bvh=ovrtx.MotionBvh.AUTO)
renderer = ovrtx.Renderer(config)
ovrtx_config_entry_t entries[] = {
    ovrtx_config_entry_motion_bvh(OVRTX_MOTION_BVH_AUTO),
};
ovrtx_config_t config = {entries, 1};

ovrtx_renderer_t* rolling_shutter_renderer = nullptr;
ovrtx_result_t result = ovrtx_create_renderer(&config, &rolling_shutter_renderer);
ASSERT_API_SUCCESS(result.status);
The motion BVH and a model’s own motion attributes, such as the Lidar generic core
model’s omni:sensor:Core:outputMotionCompensationState, are separate settings in
separate places, and setting either one does not set the other;
Motion Artifacts explains the pairing and how
to check both.
Texture streaming, render modes and GPUs#
Three more creation-time options shape what a product can do; each is documented in full on Renderer Configuration.
Texture streaming mode is disabled, synchronous or asynchronous (the default), chosen with
RendererConfig.texture_streaming_modeorovrtx_config_entry_texture_streaming_mode(). Synchronous mode controls texture-feedback processing only; it does not make every texture load synchronous.Render-mode availability. A RenderProduct can only select a render mode the renderer made available when it was created. Render Modes covers choosing a mode per product, and the renderer configuration page’s “Startup Render Mode Availability” section covers the creation-time choice.
GPU list.
active_cuda_gpusrestricts the CUDA-visible devices the renderer as a whole may use; a product’sdeviceIdsallow-list (RenderProduct device pinning) narrows the choice for that product and must be compatible with it.